
WELCOME BACK!
It is summertime again and that means the mermaids up to their crafty ways. Every week throughout the summer I will post one of our crafts for your viewing pleasure.
Here is a photo of our first craft:

Here is a photo of our first craft:
The first ingredient is alum. This is a color binder. You have to first soak your papers in this and then dry them out and press them. The paper needs to be completely flat to marble correctly.
The next ingredient you need is carrageenan which is a powder made from seaweed moss. This is tricky to find. You can't find it at normal craft stores like Michaels or A.C. Moore. You have to go to more professional art studio stores or get it on line. Unfortunately no matter where you find it it will be a little bit pricey, but marbling will not work without it. For the precise measurements to mix the carrageenan go here. After you've mixed the carrageenan with water and put it in the blender you pour it into a tray where it can set over night.
After those first two items the rest is easy:
A pan or tray for the liquid,
a stack of your alum-treated paper,
a comb like this:

(I made mine out of wood and nails) or fork to spread the paint.
You will also need acrylic paints. (I used regular craft paint, but I had to water it down so that it was the consistency of orange juice or whole milk.)
Whew! The preparation takes a lot of work, but believe me, it is worth it.
Now for the actual marbling process:
1. Drip your paint into your tray with the carrageenan/water mixture.

If you've mixed the paint to the right consistancy it will float on surface and start to spread, making what marblers call "stones."


Keep dripping paint, adding more colors until you feel like stopping.
2. At this point you could lay down the paper right on these stones and you would get a really cool design that looks something like the paper on the right:

The paper on the left was made by swirling the stones around with a stick.
Another method is using a tool to "comb" the stones.


This makes the paint move into a feather like pattern, like this:

3. How ever you decide to marble, you can't mess up. Every pattern will turn out interesting. Now that you've arranged the paint the way you want it, carefully drop your paper on the surface of the water.

This is the exciting part. Wait for the edges to curl up and then gently pull if off and be amazed at the beautiful design you created.

Isn't this awesome? It is just like magic!
4. Now hang up your paper to dry.
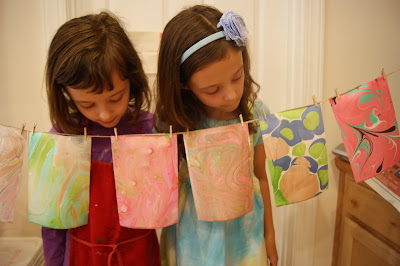
After it is dry press it under some heavy books until it is flat. You can use your paper as wrapping paper, book covers, cards or whatever.


This was the most successful craft I have done with my mermaids. Everyone had a great time, and we never ceased to be amazed at the colors and variety of patters we made. I think the girls spent about two hours making more and more cards. The carrageenan mixture lasted for all of these cards, and we could have made many more. All you have to do is wipe the surface of the carrageenan with a strip of newspaper and you are ready to drip new stones. I was amazed that we could make light colored marbled cards even after we had marbled with black paint. This was so easy to do, even my four year old could easily create marbled paper all by herself.

After we were done the girls gave their patterns names like "swirled chocolate" and "seaside." Once they were dried and pressed we put them all in envelopes to use as cards. Maybe one day you will get one of our papers in the mail!

BEAUTIFUL! I made paper in high school, and we used it for bookbinding. We made boxes, and binders, and beautiful things to always enjoy. Our process was different though: I can't remember exactly how we pulled ours off, but yours is so pretty. Yay to successful crafts! xoxo
ReplyDeleteThat is AWESOME. I am going to have to try.
ReplyDeleteThis looks crazy fun! Your girls seem to have really enjoyed the process--it does seem a little magical.
ReplyDeletewhat a cool idea! i just pinned it so i can try it out. also your blog header is so cute!
ReplyDelete