Saturday, July 17, 2010

A Craft Fraught with Peril

This was a dangerous, exciting, super-fun craft with a tragic ending.
My goal: to make some cute garden stepping stones using shards of colorful broken plates and cement.
First I gathered the plates, soon to be hammered to smitherines:

The smitherines:Because we were working with hazardous materials I called Meredith, babysitter extraordinaire, to help. (Notice the "mer" in her name? She fits so naturally into our mer-family.)

Mixing concrete with your babysitter. How fun is that?("REALLY fun," says the blue mermaid who is looking over my shoulder as I type this.)You might say that children and broken glass and hammers and concrete are not a good mix....however, they went very well togeher. It was my concrete/water mix that was doomed.
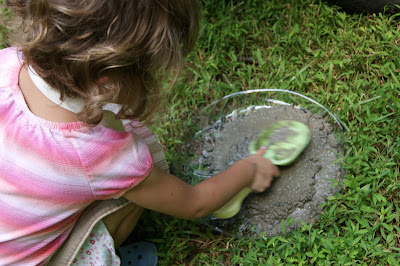
I thought I would use some left over cement in the garage that the Mer-man used for the treehouse.
But it was old and hard to break up. Then I think we didn't add enough water, and, as the guy at Home Depot told me later, I should have tapped the sides of the trays with a hammer to settle the mixture, and then laid some chicken wire in the bottom to hold it together. I know a lot about cement now.

Here is our garden stepping stone. Bare feet beware!
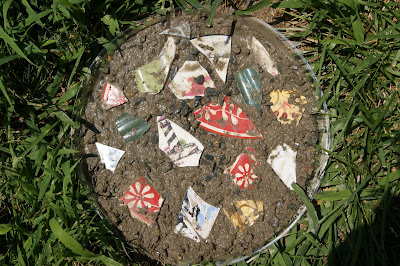


This is what our beautiful garden steps looked like the next day. Crumbly, loose and fragmented. The orange mermaid's face says it all.


But lest I get hung up on the outcome of my craft, let us all remember the reason why we do crafts. Is it so we can have some fancy junk around to decorate our homes? I hope not. Watch this video and you'll see why this craft was worth it.


Wednesday, July 7, 2010

Metta's Magnets


My friend Metta taught me how to make these pretty magnets. You take a clear marble that is flat on one side and find pictures and patterns from magazines that you like.
Then, using modge podge you glue the paper to the magnet, sealing the edges, and then glue a magnet on the back.
We found some of our best pictures from the Friend magazine.
I actually needed to make these magnets for a Relief Society activity, and the girls came to my rescue.


The girls loved this craft and came up with some pretty creative ideas.


Thursday, July 1, 2010

I Lava Science

Everything you need to make a volcano: Vinegar, dish soap, a small container, baking soda, food coloring and three girls.
Making the climb to the volcano mount (the sandbox).
Forming the cone.
The volcano is finished. Now for the ingredients.

Baking soda.


The dish soap is added. (The king and queen look on, unaware of their impending doom.)

The final ingredent, vinegar, was added after this to begin the reaction. (After doing this twice, it was decided that it is best to add the food coloring to the vinegar before pouring it into the volcano.)

Slowly the volcano lava--a bit bubbly and pink-- starts to flow. This was our first try--the lava was a little sluggish, but it was still exciting.
Our second try was much more exciting and bloody, as you can see.
The girls played in the carnage for a while after this, and then took the toys inside, washed them, and put them in the hospital.

Thursday, June 24, 2010

Office Max Publishing House

Today was storytelling day. Seizing this opportunity to develope their young creative minds I told the mermaids that there are three parts of a story: the beginning--
"--the middle and the end," the older girls chimed.
Okay, so they know that. We'll move on to a higher plane.
"Every story has to have a climax," I say. "The climax is the most excititing part of the story. But before the climax you have--"
"the rising action!" says one mermaid.
"and after the climax you have--"
"the falling action!" pipes in the other mermaid.
"Okay, smarty pants, what is after that?" I ask.
"THE RESOLUTION!" the say together.


So thanks to first grade I didn't teach them anything today, but we did make some cute little books. Each put her own personality into her story and after I typed up their stories they added illustrations. The titles are delightful: The Flower and the Monster, Syrena and Tucker, and The Missing Giraffe.

At this point I could have tied the books together and stapled them, but why do that when you can go to
and get your book BOUND!

But is it worth it to drive 20 minutes to Office Max when it is 101 degrees outside and pay three dollars for each book to get spiral bound? Perhaps, I reason...they will make really cute keepsakes...

As we were driving home the orange mermaid says,
"Mom, this isn't a paper book any more. This is a REAL book."

Yup. It was worth it.

(Here is the CLIMAX in the orange mermaids book.)

Friday, June 18, 2010

Our Mer-designer

I have a super talented friend named Nicole Empey who designed the spectacular mermaid treehouse header you see above.

... we are hoping to get her to come a little later in the summer to be an honorary mermaid guest crafter, and then you can meet her.

Thanks, Nicole!!


Thursday, June 17, 2010

Beads+Elastic=Happiness

The mermaids are out of school and back at home! To celebrate we made some bead bracelets. (It is also a fun way for the Orange Mermaid to become more acquainted with her letters.) This was a huge success. Maybe it was the beads....maybe it was just that this is the first craft of the summer. Happy day!

We made some for us...

...and some for our friends:


We've got a lot more crafts planned for the next few weeks so stay with us!


Friday, August 21, 2009

Last Craft of the Summer

School starts next week, so this is our last craft of the summer. Here is a list of what we used for this craft:
Canvas
mod podge
paintbrushes
magazine clippings


First I cut out a bunch of colors from the pages of magazines. I separated them into to piles: warm colors and cool colors.

Then I drew the shape of a fish on the canvas. When it was time for the craft, the mermaids painted mod podge over the canvas and started pasting the magazine clippings to the canvas.


I told them to use the warm colors for the fish body and the cool colors for the water.
After the canvas was completely covered and there was no white showing, the they spread mod podge over the top.

The mermaids enjoyed this craft a lot, and I am going to put a black frame around these fishes and hang them in my bedroom.


Have a great school year, and we'll see you next summer!